Account Payments
How to get there: Program Menu > Accounts Receivable > Account Payments OR Program Menu > Counter System > Customer Dashboard > Enter Customer Name > Tools
This program permits you to enter account payments that have been received. You may also run this program to apply any existing credit to the account.
To enter payments:
| 1. | Enter your operator ID, and then press ENTER. |
| 2. | You will now be prompted to enter a PASSWORD to gain access to the payment screen. If you do not know the password, or do not have a high enough level password, you will need to contact your company’s administrator. |
| 3. | You must select the customer account to which you would like to apply a payment. |
| 4. | The program will display all the contracts for the selected customer and display the total Contract Balance, Unused Credits, and Net Balance. You will then have the option to Make Payment, Apply Credits, or Correct Previous Payment. |
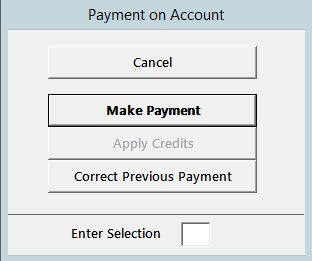
Make Payment – This is the normal option to make a payment on the customer’s account.
Apply Credits – This option is only available if the customer has a credit on their account. By selecting this option, you will be able to apply existing credits to the customer’s unpaid contracts. After selecting this option, you will proceed with Step 11 below.
Correct Previous Payment – This option allows you to back out of a previous payment entered. A listing of all the payments for this customer will be shown. Click on the payment that you want to back out. The payment will be reversed along with any payments made on contracts will also be reversed. After selecting this option, you will proceed with Step 13 below.
| 5. | You will be asked to enter and verify the payment amount. A prompt similar to the following will be displayed: |

*Note - If you are correcting an account overpayment, enter the payment amount as a negative amount. You will also need to enter the payment type; check, credit card, debit card, cash, or credit memo. If payment method is by check, the check number will be requested. If the payment method is by credit card, the credit card number will be requested. If the payment method is by credit memo, you must select the disbursement item to expense the credit memo. Note: There is a check box for whether the payments will be placed in the cash drawer. The program must know this in order to update the cash drawer amount. There is a parameter setting to set the default value for this. If you change the setting from the default value, you will be required to enter the Owner or Manager’s level password. The most common would be to put the payments into the cash drawer. You would not put the payments in the cash drawer if it is your company’s policy to make separate bank deposits for your received on account checks.
| 6. | Next you will be asked to enter a payment description, up to 72 characters long. This can be anything you wish to describe the payment. |
| 7. | If the Contract Balance is $0.00, step 11 below will be performed. |
| 8. | If you have a prompt pay percentage entered in your parameters, you will be asked how much discount you wish to apply. |
| 9. | If the resulting payment amount is $0.00, step 11 will be performed. |
| 10. | If the payment amount can be applied totally to the oldest Closed contracts, then you will be asked if you want to automatically apply the payment. If you answer Yes, then each of the oldest contracts will be paid in full until the payment funds remaining reach $0.00. |
| 11. | You will next see a screen such as the following: |
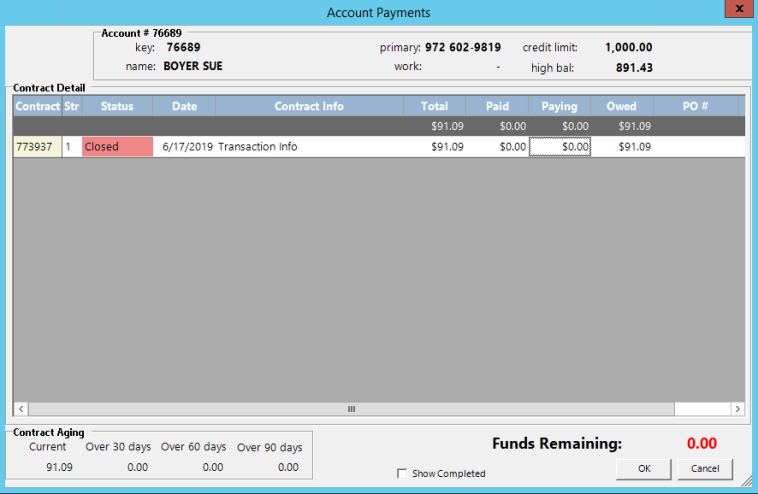
Each contract for the customer is listed showing the status, open date, contract info, and contract total, previously paid amount, paying amount, and owed amount. To pay a contract, click on the Owed amount for that contract. To UN-pay a contract, click on the Paid amount for that contract. To manually enter an amount less than the total owed amount, click on the Paying amount, then type in the desired amount. If the customer has unused credits, you can apply the credits in the same manner; click on the Owed amount or manually enter an amount in the Paid column.
*NOTE: When a credit is created from an overpayment, the user will be prompted to add a note which will be written to the contract info field. This will make it easier to identify how a credit was created in Customer Dashboard, Invoices and Statements.


When you have finished applying the payment to the contracts, click the OK button. If you want to totally cancel this payment, click the CANCEL button.
If you check the Show Completed check box, the completed contracts (closed and fully paid) will show for this customer. This would only be necessary if you previously paid off the wrong contract and needed to un-pay the contract. A new button will also be displayed labeled: Historical. By clicking this button, a listing of all the customer’s historical contracts will be shown. You can click on any of these historical contracts to move them to the active status and allowing you to un-pay any of these contracts as well.
| 12. | At the bottom of the screen, the Funds Remaining shows the amount leftover that was not applied to any particular contracts. Any remaining funds will be credited to the customer's account. |
| 13. | You can then print, Fax, or email the payment receipt to your customer. You will see a screen similar to the following: |

Print to – With this option checked, a copy of the payment receipt will be printed to the selected printer.
FAX – With this option checked, a copy of the payment receipt will be Faxed to the customer at the selected Fax number.
Email – With this option checked, a copy of the payment receipt will be emailed to the customer at the email address with a subject line and email body as entered. You can select an email address from the drop down menu of all email addresses entered in the contacts for this customer or you can type a new email address in the box.
Note: You can check multiple boxes so that you get a printed copy and the customer is emailed a copy as well.
| 14. | You are then asked if there are more payments to be entered. If you reply “Yes”, then return to step 1 above for the next customer. |
| 15. | Once you have finished making all the payments, a summary of payments applied for each customer's account will be printed and you will be returned to the PROGRAM MENU. |